


A glowing lantern is more than just a source of light; it creates atmosphere, invites presence, and fills a space with calm energy. Crafting your own lantern brings that soft illumination into your home with a personal touch. This project shows you how to make a sphere lantern from plaster—a decorative piece that works perfectly for cozy evenings, seasonal decorating, or as a thoughtful handmade gift.
In this guide, you will make a hollow plaster globe using a balloon as a mold, line the interior with reflective foil, customize the exterior however you like, and finish with a candle or LED light that casts a gentle, warm glow.
What You’ll Need
Before you begin, gather the following materials:
- Plaster strips (plaster gauze, available at craft stores or online)
- A small balloon to serve as the mold
- Scissors for cutting plaster strips
- A bowl of water to moisten the plaster strips
- Gold foil or leaf to line the inside of the sphere
- Liquid craft glue and a brush to attach the foil
- Acrylic or other paints for decorating the outside
- A tealight candle or LED light for illumination
Once all materials are assembled, you can start creating your lantern.
Step‑by‑Step Instructions
1. Prepare the Balloon Form
Inflate your balloon to the size you want your lantern to be. This balloon will determine the final size and shape of the plaster sphere. Choose a size that fits your planned display area—larger lanterns create more ambient light, while smaller ones are ideal for tabletops or shelves.
2. Cut the Plaster Gauze
Cut the plaster gauze into strips roughly 10–15 centimeters long. This length is easy to work with and helps you cover the balloon evenly without creating thick, uneven layers.
3. Apply Plaster to the Balloon
Dip each strip of plaster gauze in water, then place it onto the balloon surface. Work systematically, overlapping the strips slightly to build a stable and even shell over approximately half of the balloon. Continue applying strips in layers until you have covered enough of the balloon to form a robust lantern wall.
4. Let the Plaster Dry
Place the plaster‑covered balloon in a safe spot and allow it to dry completely. Drying time can vary depending on temperature and humidity, but expect several hours or up to a full day. The plaster must be thoroughly dry and firm before moving to the next step.
5. Deflate and Remove the Balloon
Once the plaster has hardened, pop the balloon with a needle and gently remove it from inside the plaster shell. What remains is a hollow plaster globe with an open top.
6. Line the Interior with Gold Foil
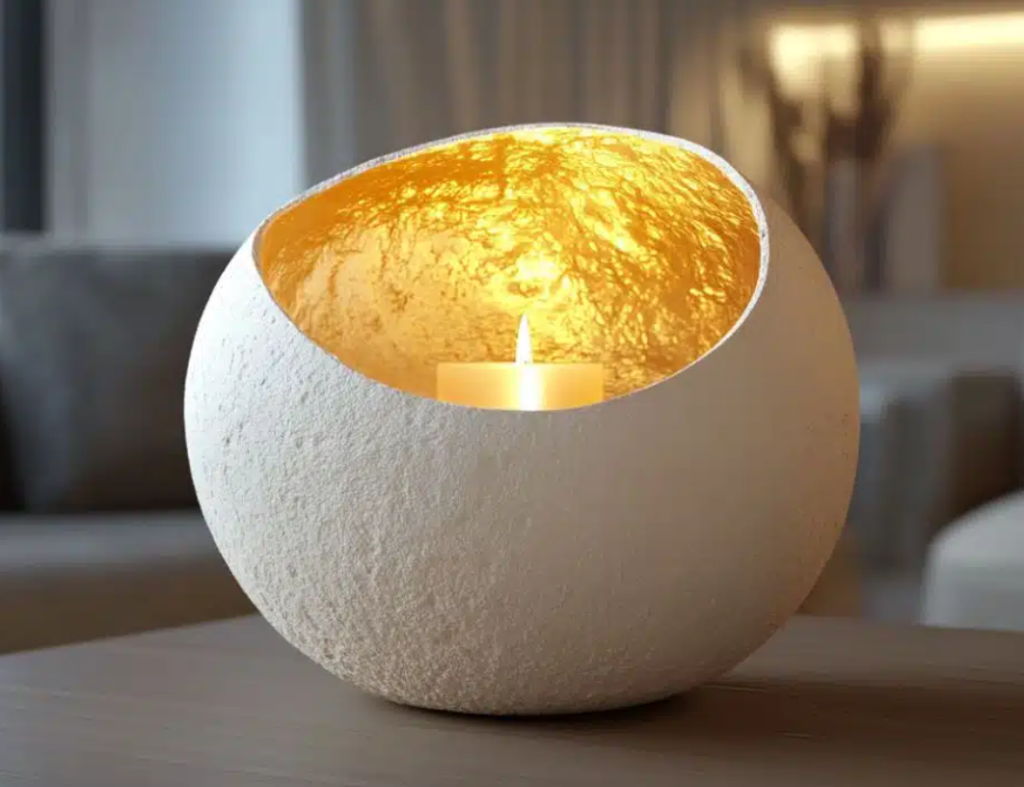
Using your brush and craft glue, apply a layer of adhesive to the inside of the plaster sphere. Work carefully so the glue is tacky and ready for the gold foil. Press the foil gently into the glue, smoothing out any wrinkles. The reflective surface created by the foil will catch the flicker of your candle or LED, giving the lantern a radiant, golden glow.
7. Customize the Exterior
Now comes the creative part: decorating the outside of the lantern. You can keep it simple with soft pastel paint, or add texture and pattern with bolder colors. Some ideas include:
- Painting soft gradients or ombré effects for a gentle feel
- Using dots, stripes, or geometric patterns for a modern look
- Adding natural elements like pressed leaves or small stones for texture
- Applying metallic accents or splatters for extra shine
There are no rules—let your aesthetic preferences guide your design.
8. Insert Your Light Source
After the exterior paint has dried, place a tealight candle or an LED light inside the lantern. If using a real candle, be sure it sits securely and choose an LED version if safety and longevity are priorities. The open top allows light to escape in soft beams, while the gold lining enhances the radiance.
Five Creative Exterior Ideas
To inspire your decorating, here are five simple approaches you can try:
1. Natural Impressions with Leaves
Press leaves or small branches into wet plaster before it dries. Once dry, remove them to reveal delicate impressions that evoke the beauty of nature.
2. Soft Pastel Finish
Use acrylic paints in gentle pastel tones to create a calm, understated surface. You can apply the color evenly or blend multiple shades for subtle transitions.
3. Polka Dots or Stripes
A classic design like polka dots or stripes adds visual rhythm. Use a small brush or cotton swab to paint evenly spaced patterns in contrasting colors.
4. Ombre Gradient
Blending two colors from light to dark creates an ombré effect that feels both modern and serene. Start with a lighter shade at the top and gradually deepen the color toward the base.
5. Metallic Accents
Add a touch of elegance with metallic gold or silver splatter. Lightly tap a brush loaded with metallic paint over the surface for an artistic finish that glimmers in candlelight.
Conclusion
This DIY plaster sphere lantern project merges creativity with ambience. The reflective interior and customizable exterior make it a versatile decoration for autumn, winter holidays, or any time you want to create a calming corner in your home. Whether you paint it boldly or keep it minimal, your handcrafted light will elevate your space with warmth and style.

